Posts

Showing posts from 2020

Run the Emulator directly in Android Studio

Image
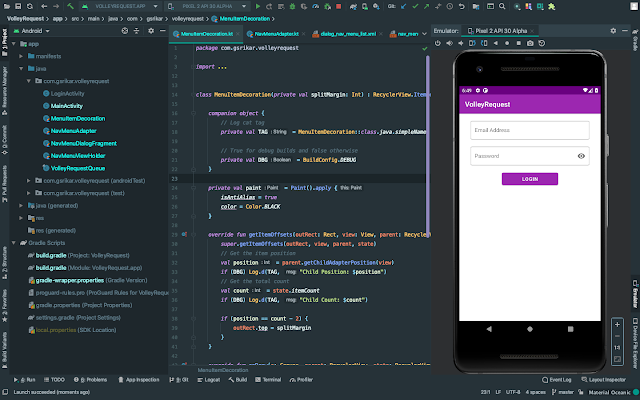
In Android Studio 4.1, a minor feature is released to reduce the screen (or window) switching between Android Studio and the Emulator. Using this feature, we can now run the Emulator directly inside the Android Studio. We can make the changes to the code and see the changes reflect in the emulator in the same window similar to layout XML and its preview. To achieve this, open the Preferences window and select the Emulator menu item under the Tools expandable menu. Here we can check the option Launch in a tool window and click OK . Now run the Emulator to see it inside the Android Studio window.

Track Android App Crashes Using Firebase Crashlytics

Crashes irritate the users and ruin the impression of the application while frequent crashes provoke the user to uninstall the application. Most of them might choose a competitors app and some of them might leave bad reviews on the Play Store. Either way, the application crashes negatively affect the business. Minimizing crashes is critical in improving overall user experience and retaining them. Best way to understand the issues in the application is by tracking crashes and solving. We need to find out if a particular crash is impacting a lot of users, get alerts when an issue suddenly increases in severity. and figure out which lines of code are causing crashes. Firebase Crashlytics is one such product that helps track crashes in realtime, understand the severity, get a glimpse of user composition affected by the crash, stack trace to resolve the crash and more. Before we start integrating the Firebase Crashlytics, we need to add Firebase to our project . Once we have added Firebase,

Add a Module to an Android Project

Image
In this article, we will take a look at creating a new module and adding it to our project. First, create a new project or open an existing project. Right-click or tap with two fingers on the app module or the project. This opens an options menu where we need to click on New and then on Module option in order to start the process of creating a module. The other way to start the module creation process is by clicking on the File menu in the top bar, hovering over New option and then clicking on the New Module option. Clicking on the New Module option opens a window where we need to select the Module type. Select the preferred module type based on feature development. For example, we can select the Android Library type if we are building a library, the Android TV Module if we want to expand our app to be available on TV, the Dynamic Feature Module if we want the feature to be available upon user request and not bloat the app size when packaging. In the next window, we have to en

Create Assets Folder, Add Files and Read Data From It

Image
Sometimes, we need to read the data stored in the files during runtime and want to make sure the data is not tampered by the Android build system. In this article, we will take a look at how to create the assets folder using Android Studio and read the stored data from it. First, Right-click on the module name or the package name. This opens an option window where we need to select the Assets Folder option by hovering over New and then on the Folder option. Now, we will see a window where we change the folder location and the source set. Change the values if necessary otherwise keep the defaults and click Finish. It may trigger a Gradle Sync. Irrespective of the sync, the Assets folder is created and is visible in the module. Now, Right-click on the Assets folder and click on the File option by hovering over the New option. Enter the name of the file name and click Enter to create the file. The file with the name user_details.json is created under the assets folder. Add some JSON

Create Multiple YouTube Channels

Image
In this article, we will take a look at creating multiple YouTube channels under the same email address instead of using multiple email addresses for multiple YouTube channels. 1. Go to the Youtube account settings page. 2. Find and click on the Add or manage your channel(s) option under the Your YouTube Channel section. 3. In the next page, we are shown the list of existing channels and an add button to create another channel. Click Create a new channel card. 4. In the next page, enter the channel name (brand name) and click the  Create button. 5. After multiple redirects, we are taken to the home page of our channel where we can start uploading our videos to the new channel.

Add Options Menu to Activity and Fragment

Image
Options Menu contains a set of primary menu items that are accessible to the user. In this article, we will take a look at how to implement the options menu in an Android Activity or a Fragment. Right click on the res directory in Android Studio and select Android Resource File option. It opens the Resource File creation modal where we need to enter the file name and select Resource Type as Menu. Clicking on OK button creates main_menu.xml under menu directory. Now add the following items to the XML file. <menu xmlns:android="http://schemas.android.com/apk/res/android" xmlns:app="http://schemas.android.com/apk/res-auto"> <item android:id="@+id/search" android:icon="@drawable/ic_search_white" android:orderInCategory="100" android:title="@string/action_title_search" app:actionViewClass="androidx.appcompat.widget.SearchView" app:showAsAction="ifRoo

Change Snackbar Position When Bottom App Bar or Bottom Navigation View Is Present

Image
The SnackBar is mainly used to provide feedback to the user and it is shown at the bottom of the screen. This UI element is used alongside Toast or as a replacement in some application. We typically show snack message as follows. // Show snack message Snackbar.make(binding.coordinatorLayout, message, LENGTH_SHORT) .show(); This works well as long as the screen does not contain the Bottom App Bar or the Bottom Navigation View. When we have the specified elements the Snack Message overlaps on the Bottom App Bar or ends up behind the Bottom Navigation View. This behavior is shown in the images below. To avoid such behavior we need to use setAnchorView method and pass id of a view. The Snack Message is shown on top of the view element with the specified id. // Show snack message Snackbar.make(binding.coordinatorLayout, message, LENGTH_SHORT) .setAnchorView(binding.fab) .show(); Similarly, when Bottom Navigation View or Floating Action Bu

Material Chip in Android

Image
Chip , a Material Design Component is used as an action like setting an alarm or a choice like selecting a gender or to filter items like dress types or input types like hints. Similar to RadioGroup , if we want to create a group of chips with single selection behavior we use ChipGroup and set singleSelection variable to true. <com.google.android.material.chip.ChipGroup android:id="@+id/genderChip" android:layout_width="0dp" android:layout_height="wrap_content" android:layout_marginStart="@dimen/edit_text_horizontal_margin" android:layout_marginTop="@dimen/edit_text_vertical_margin" android:layout_marginEnd="@dimen/edit_text_horizontal_margin" app:layout_constraintEnd_toEndOf="parent" app:layout_constraintStart_toStartOf="parent" app:layout_constraintTop_toBottomOf="@+id/fullNameTextInputLayout" app:singleSelection="true">

Create Github Repository

Image
Github is a freemium cloud-hosted version control system where the developers can host unlimited public and private repositories for free. Follow the below steps to create a new repository on Github. 1. The very first thing to do is go to the link https://github.com/new . It provides the fields to enter in order to create our repository. 2. Enter the Repository name  and Description for our project. 3. We can select our project to be a Public project or restrict it to be Private . 4. In addition to that, we can create our project with a default README file by checking the box, gitignore file by selecting the language and a license from the dropdown. 5. Finally, click on the  Create repository button. This creates a Private project that a link  https://github.com/gSrikar/Android-Studio-Settings .

Request Result Using startActivityForResult and Listen to It in onActivityResult

Let us say we have two activities (First Activity and Second Activity) in our Android application then startActivityForResult() is used by the First Activity when it expects a result from the Second Activity and onActivityResult() is used to read the returned result from the Second Activity. In simple terms, we can send information to the top activity in the back stack. From our First Activity, start the Second Activity with a request code. // Open the second activity startActivityForResult( Intent(context, SecondActivity::class.java), REQUEST_CODE_FETCH_RESULT ) This opens the Second Activity. When we are done with the Second Activity and want to pass the data back to the First Activity, we call setResult and close our Second Activity. // Set the result in the Second Activity val intent = Intent().apply { // Intent extras putExtra(BUNDLE_EXTRA_ACTIVITY_FINISHED, true) } activity?.run { // Set the result setResult(RESUL

How to Create an Emulator in Android Studio

Image
In this article, we will take a look at how to create an emulator in Android Studio. First, open Android Studio to create a project or open an existing project. Now, Click on the Tools in the top menu and then on AVD Manager . This opens the Android Virtual Device Manager where we can create our emulators. Start the creation of the emulator by clicking on the Create Virtual Device button. It opens a new screen where we select the device hardware. In addition to the available hardware profiles, we can import an existing profile or create new hardware by clicking on the options at the bottom left. Click Next after selecting the hardware profile. Now we are asked to select the OS Version. Select the preferred one and download it if necessary. After that, click Next . Verify the configuration of the selected hardware. If we want to tweak more than the AVD name then in the advanced settings we can change the number of cores, RAM, internal Storag

Get the Result From Last Activity When Middle Activity Is Finished

We usually get the result from an activity by starting it with startActivityForResult() and listening to the onActivityResult() in the calling activity. But there are some cases, where we may want the result to be received from the subsequent activities rather than the immediately invoked activity. For example, let's take three activities named FirstActivity , SecondActivity (middle activity) and ThirdActivity (last activity). They have a feature through which the first activity opens the second activity and the second activity opens the third activity closing itself. Now, the third activity has to send the result back to the first activity. In this article, we will take a look at this scenario where we have to send the result from the last activity and read it in the first activity. As usual, we start the middle activity for the result from the first activity. // Open the middle activity startActivityForResult( Intent(context, SecondActi

How to Change Material Chip Text Size, Text Style and Font

Chips in Android is a Material Design Component used primarily for actions or choice or during filters or as an input. The attributes like textColor , textStyle and fontFamily are ignored when added to the Material Chips directly. We need to modify these values using textAppearance . <com.google.android.material.chip.Chip android:id="@+id/maleChip" style="@style/Widget.MaterialComponents.Chip.Choice" android:layout_width="wrap_content" android:layout_height="wrap_content" android:checkable="true" android:layoutDirection="locale" android:text="@string/chip_text_male" android:textAppearance="@style/AppTheme.GenderChip" android:textColor="@color/colorWhiteText" app:chipBackgroundColor="@drawable/select_chip" app:chipEndPadding="@dimen/chip_horizontal_margin" app:chipStartPadding="@dimen/chip_horizontal_margin&quo

Use Kotlin Android Extensions to Replace findViewById

Kotlin Android Extensions is a great way to avoid writing findViewById in the activity or fragment. Simply, add the kotlin-android-extensions plugin to the module level build.gradle file. apply plugin: 'kotlin-android-extensions' Only one step to enable the feature. Now, we can remove the manual initializations. // Initialize the UI elements val constraintLayout = findViewById<ConstraintLayout>(R.id.coordinatorLayout) val responseTextView = findViewById<TextView>(R.id.responseTextView) val bottomAppBar = findViewById<BottomAppBar>(R.id.bottomAppBar) val fab = findViewById<FloatingActionButton>(R.id.fab) val productRecyclerView = findViewById<RecyclerView>(R.id.productRecyclerView) val filterButton = findViewById<Button>(R.id.filterButton) val sortButton = findViewById<Button>(R.id.sortButton) The compilers suggest us only one import to get all the synthetic properties available in the layout. If the above views are a

Add View Binding to Replace findViewById

View Binding initializes every UI element which has an id in the layout files and exposes them to the developers through a generated class. If you think writing findViewById in every activity or fragment should not be a developer's job then you are reading the right article. Does the code inside the activity or fragment start like this? Manual UI elements initialization // Initialize the UI elements final ConstraintLayout constraintLayout = findViewById(R.id.coordinatorLayout); final TextView responseTextView = findViewById(R.id.responseTextView); final BottomAppBar bottomAppBar = findViewById(R.id.bottomAppBar); final FloatingActionButton fab = findViewById(R.id.fab); final RecyclerView productRecyclerView = findViewById(R.id.productRecyclerView); final Button filterButton = findViewById(R.id.filterButton); final Button sortButton = findViewById(R.id.sortButton); Butter Knife UI elements initialization // UI elements @BindView(R.id.coordinatorLayout) Coordinato

How to Fetch and Save Stock Price

Historical stock prices are available on a significant number of websites to download but wouldn't it be easier to use a script to fetch these prices and save it to our local machine? In this article, we will learn how to fetch the historic stock prices of a company using Python. Let's first import the required dependencies to perform the actions. # Get the dates import datetime # Create files in the operating system import os # Convert data frames to file formats import pandas as pd # Fetch the stock prices import pandas_datareader as web # Find relative dates of the past or of the future from dateutil.relativedelta import relativedelta Now, create a StockPrice class with a helper function fetch to fetch the stock price and save function to save the stock prices to the local folder. class StockPrice: """ Provide functionality to fetch the historical stock prices and save it to a path """ def __init__(self):

Alert Dialog - Material Design Component

Image
Alert Dialog in Android is a blocking window shown to the user for immediate user attention and interaction. To build and show an alert dialog, we will be using MaterialAlertDialogBuilder . It is an extension of AlertDialog.Builder that we are familiar with but provides Material theming to the dialog. The below pictures shows the subtle differences in using MaterialAlertDialogBuilder and AlertDialog.Builder . Dialog built with MaterialAlertDialogBuilder Dialog built with AlertDialog.Builder Before, we start implementing the Material Alert Dialog, add Material Design Components to our project. Now, let's create the Alert Dialog. private fun showAlert(context: Context) { // Build the dialog val builder = MaterialAlertDialogBuilder(context) // Set Dialog title .setTitle(context.getString(R.string.alert_dialog_title)) // Set Dialog message .setMessage( context.getString( R.string.alert_dialo

Add Navigation Components to the Project

Image
Navigation helps the users navigate inside the application between fragments and the activity. Navigation Component, on the other hand, is part of Android Jetpack and helps us (the developers) build navigation for component clicks, deep links and more. Navigation Component consists of Navigation Graph, Nav Host and the Nav Controller. We will talk about them in detail throughout the article and implement it. 1. First, add the dependencies to the module level build.gradle file. implementation 'androidx.navigation:navigation-fragment-ktx:2.2.0' implementation 'androidx.navigation:navigation-ui-ktx:2.2.0' 2. Create a Nav Host The Nav Host is a container for all the fragments to be shown on. With the help of Nav Controller, the developer can navigate the user between fragments and nested nav graphs. <fragment android:layout_width="match_parent" android:id="@+id/nav_host_fragment" app:defaultNavHost="true" a

Bottom App Bar for Android - A Material Design Component

Image
Similar to an App Bar (Top App Bar or Toolbar), Google introduced the Bottom App Bar as part of the Material Design Components back in 2018. Let's get into the implementation by adding a dependency to the build.gradle file. implementation "com.google.android.material:material:1.2.0-alpha03" In the next step, let's add the BottomAppBar and the FloatingActionButton to the activity layout. <com.google.android.material.bottomappbar.BottomAppBar android:id="@+id/bottomAppBar" style="@style/Widget.MaterialComponents.BottomAppBar.PrimarySurface" android:layout_width="match_parent" android:layout_height="wrap_content" android:layout_gravity="bottom" app:hideOnScroll="true" app:fabAnimationMode="slide" app:menu="@menu/menu_main" app:navigationIcon="@drawable/ic_menu_white" /> <com.google.android.material.floatingactionbutton.F