Posts

Showing posts from March, 2020

How to Create an Emulator in Android Studio

Image
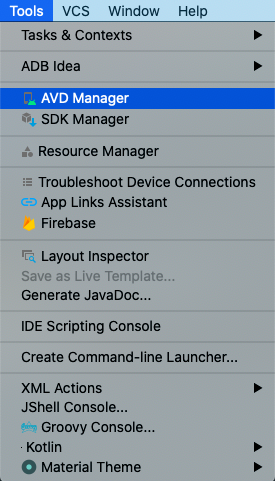
In this article, we will take a look at how to create an emulator in Android Studio. First, open Android Studio to create a project or open an existing project. Now, Click on the Tools in the top menu and then on AVD Manager . This opens the Android Virtual Device Manager where we can create our emulators. Start the creation of the emulator by clicking on the Create Virtual Device button. It opens a new screen where we select the device hardware. In addition to the available hardware profiles, we can import an existing profile or create new hardware by clicking on the options at the bottom left. Click Next after selecting the hardware profile. Now we are asked to select the OS Version. Select the preferred one and download it if necessary. After that, click Next . Verify the configuration of the selected hardware. If we want to tweak more than the AVD name then in the advanced settings we can change the number of cores, RAM, internal Storag

Get the Result From Last Activity When Middle Activity Is Finished

We usually get the result from an activity by starting it with startActivityForResult() and listening to the onActivityResult() in the calling activity. But there are some cases, where we may want the result to be received from the subsequent activities rather than the immediately invoked activity. For example, let's take three activities named FirstActivity , SecondActivity (middle activity) and ThirdActivity (last activity). They have a feature through which the first activity opens the second activity and the second activity opens the third activity closing itself. Now, the third activity has to send the result back to the first activity. In this article, we will take a look at this scenario where we have to send the result from the last activity and read it in the first activity. As usual, we start the middle activity for the result from the first activity. // Open the middle activity startActivityForResult( Intent(context, SecondActi

How to Change Material Chip Text Size, Text Style and Font

Chips in Android is a Material Design Component used primarily for actions or choice or during filters or as an input. The attributes like textColor , textStyle and fontFamily are ignored when added to the Material Chips directly. We need to modify these values using textAppearance . <com.google.android.material.chip.Chip android:id="@+id/maleChip" style="@style/Widget.MaterialComponents.Chip.Choice" android:layout_width="wrap_content" android:layout_height="wrap_content" android:checkable="true" android:layoutDirection="locale" android:text="@string/chip_text_male" android:textAppearance="@style/AppTheme.GenderChip" android:textColor="@color/colorWhiteText" app:chipBackgroundColor="@drawable/select_chip" app:chipEndPadding="@dimen/chip_horizontal_margin" app:chipStartPadding="@dimen/chip_horizontal_margin&quo