Posts

Showing posts from 2019

Add Firebase Google Analytics to the Android Project Using the Firebase Assistant

Image
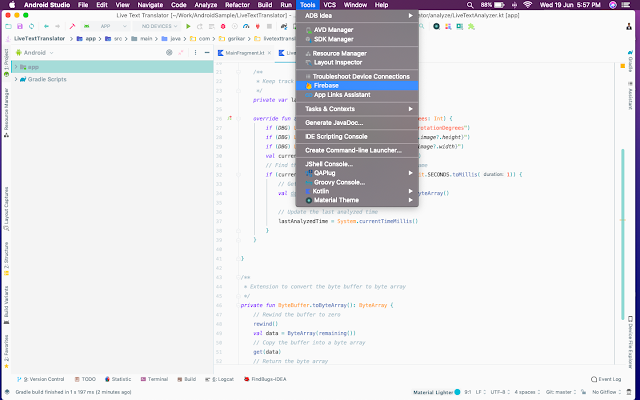
Google Analytics for Firebase is an analytics solution that helps the developers understand user behavior in their applications. In this article, we will take a look at creating a Firebase project and adding Analytics to the android project with the help of Firebase Assistant available in the Android Studio IDE. 1. Open an existing Android project or create a new project in the Android Studio. 2. Tap on the Tools tab and select the Firebase option. 3. This opens the Firebase Assistant window on the right side of the Android Studio. Expand Analytics and tap on Log an analytics event . 4. Now, we can see the instructions to integrate Analytics. Click on the Connect to Firebase button. [If we are not logged in to the google account, a Sign in with Google page is opened in the browser. Once logged in, it is redirected to another webpage where we need to select Login to Firebase option.] This opens a dialog with the options to select the project name fr

Capture Images with CameraX

Image
Google at its 2019 I/O introduced CameraX, a camera library as part of the Jetpack support library. With CameraX, the developers can spend less time writing the logic to set up the preview to analyze the preview or capture an image and more on time business logic. CameraX is built to simplify three use cases when building a camera application. These are showing a preview, taking a picture and analyzing the image. In addition to that, CameraX provides what is called CameraX Extensions, which enables the developers to take advantage of the device-specific and vendor-specific effects like bokeh, HDR, Night, Beauty mode. With this, the features of the native camera application on the device can be easily extended to our application. A temporary disadvantage is that the CameraX is available for the devices running API 21 (Lollipop or Android 5.0) and higher. This is because of its heavy use of Camera2 API's. In this article, we will take a look at how to show camera

Listen to Phone Restarts on Android

When a phone is restarted the system broadcasts ACTION_BOOT_COMPLETED to all the apps that have the RECEIVE_BOOT_COMPLETED permission . In this article, we will learn how to make our app listen to phone restarts. 1) Add permission to the AndroidManifest.xml file. <uses-permission android:name="android.permission.RECEIVE_BOOT_COMPLETED"/> 2) Create a broadcast receiver and add ACTION_BOOT_COMPLETED intent filter to receive the broadcasts. <receiver android:name=".BootCompletedReceiver"> <intent-filter> <action android:name="android.intent.action.BOOT_COMPLETED" /> </intent-filter> </receiver> public class BootCompletedReceiver extends BroadcastReceiver { private static final String TAG = BootCompletedReceiver.class.getSimpleName(); @Override public void onReceive(Context context, Intent intent) { if (intent != null && intent.getAction() != null &

Add Spacing to Recycler View Linear Layout Manager Using Item Decoration

Image
In this article we will learn about, item decoration in Android and how we can use it to add even spacing between the child items. A RecyclerView without spacing will look like the image below but in most cases, we want to add spacing between the items. [You can see there are no margins between the views and only elevation] A more traditional option is adding margins in the list item xml file. If we take this route, we will soon end up with uneven spacing issues with vertical margins. [There are even left, right, top, bottom margins for all the rows except the last item in the first image and in the subsequent image, the top margin for the first item is half of the other items] The best way is to add the ItemDecoration to the RecyclerView as it affects the individual items and you can have more control over them. Kotlin: /** * Add vertical, horizontal spacing to the recycler view */ class DefaultItemDecorator(private val horizontalSpacing: Int,

Translucent and Transparent Background for Activity

Image
We are already familiar that an Activity in Android is a single screen on the device but in this article, we will learn how to make it transparent and translucent. 1. Open styles.xml and add the background theme. <!-- Background Theme for Activity --> <style name="AppTheme.NoActionBar.TranslucentBackground" parent="AppTheme.NoActionBar"> <item name="android:windowBackground">@color/colorBackgroundPromotions</item> <item name="android:windowIsTranslucent">true</item> <item name="colorPrimaryDark">@color/colorBackgroundPromotions</item> <item name="android:windowTranslucentStatus">true</item> </style> Set windowIsTranslucent and windowTranslucentStatus tags to true . As the name implies, windowBackground is the background color for an activity and is set to a custom color. Overriding the colorPrimaryDark will make the status bar tra

How to Set an Android App as a Default Dialer

Image
A default dialer is an application that handles the Phone calls on the device. Google made the provision for third-party applications to be a default phone handler from SDK 23 (6.0, Marshmallow version). In the article, we will learn about how to set our Android application as a default dialer. 1) Add the below intent filters under the activity tag in the AndroidManifest.xml. <intent-filter> <action android:name="android.intent.action.DIAL"/> <category android:name="android.intent.category.DEFAULT"/> </intent-filter> <intent-filter> <action android:name="android.intent.action.DIAL"/> <category android:name="android.intent.category.DEFAULT"/> <data android:scheme="tel"/> </intent-filter> 2) Check if our application is already a default dialer app using TelecomManager. val telecomManager = getSystemService(Context.TELECOM_SERVICE) as TelecomManager Log

How to Enable Multidex for Android App

The number of methods an Android app can have is limited to 65,536 (64 * 1024). Once the limit is crossed, the app builds fail with an error that says Cannot fit requested classes in a single dex file . AGPBI: {"kind":"error","text":"Cannot fit requested classes in a single dex file (# methods: 76137 \u003e 65536)","sources":[{}],"tool":"D8"} > Task :app:transformDexArchiveWithDexMergerForDebug FAILED java.lang.RuntimeException: java.lang.RuntimeException: com.android.builder.dexing.DexArchiveMergerException: Error while merging dex archives: The number of method references in a .dex file cannot exceed 64K. To continue adding methods beyond the infamous 64k method limit, we need to enable multidex in our application. Let's get started. 1) Add the dependency to module level build.gradle file. implementation 'com.android.support:multidex:1.0.3' 2) In the same module level build.gradle

How to Generate Android App Bundle (Signed and Debug)

Image
App Bundle reduces the number of Android apks that needs to be generated, released and maintained. It is the new format that is build and uploaded to the Google Play Store. Google takes the bundle, generates appropriate apks based on the device architectures, screen densities, device languages and serves to the device as a part of Dynamic Delivery. As a first step, lets generate a debug version of the app bundle and after that lets take a look at generating a released version of the app bundle. Generated app bundles are in .aab format. Generate Debug Version: 1) Click on the Build  menu option at the top, select the Build Bundle(s)/APK(s) and click Build Bundle(s) . Debug app bundle is generated and saved to ../app/build/outputs/bundle/debug/app.aab. Generate Release Version: 1) Similar to the step followed while generating a debug version, click on the Build menu option. 2) It opens a dialog with options to build a bundle or an apk. Select the Android

How to Migrate to AndroidX

Image
In this article, we will refactor an existing support library project to Androidx. The package names, dependency names change and rest (like class names, method names) stays the same. 1) Click Refactor and then Migrate to AndroidX. 2) Click Migrate and make sure the back up option is selected. 3) Provide a location to save the backup of the entire project. 4) Verify the dependencies, the package names that are getting refactored and then finally Click Refactor. Once finished, you can see the updated package names and dependency names. In addition to that, the Refactor option adds android.useAndroidX=true and android.enableJetifier=true to gradle.properties file. This converts the support library package names of the non-convert third-party libraries. This process is fairly simple but there might be issues faced and the refactor may fail, so backing up the project or tracking the changes using git is necessary to avoid the project loss.

How to Migrate to Material Components (MDC)

Image
Material Components (MDC) is built by developers at Google (separate from the Android team) with intentions of helping developers build Material Design in their web and mobile-based apps. This is the next iteration of Material Design released in 2014. Follow the steps mentioned below to migrate the app to use the Material Design Components instead of AppCompat or default UI components. 1) Add the Material Components dependency to the module level build.gradle file. implementation 'com.google.android.material:material:1.1.0-alpha02' 2) In the styles.xml Replace AppCompat with MaterialComponents . If you performed the action successfully then your base application theme will look like this.     <!-- Base application theme. -->     <style name="AppTheme" parent="Theme.MaterialComponents.Light.DarkActionBar">         <item name="colorPrimary">@color/colorPrimary</item>         <item name="colorPrimaryDar

Intro to Activity and Its Lifecycle

Image
Activity is one of the four components of Android and it provides an interface to the user so that they can interact with the views. Simply, activity is a single screen in an app. It could be a maps screen in the Google Maps app or user profiles in the Facebook app or contacts list screen in the Contacts app and settings screen in the Settings app. Most apps contain multiple screens and inside these screens, you have buttons, edit texts, check boxes, list items and more with which you can interact. Activities should be declared in the manifest file and of all the activities in an app, only one activity will be the launcher activity. How to create an Activity: 1) Right click on the app module, hover over New  option and then on the Activity . 2) Now, select the Basic Activity  and change the activity name to Second Activity . 3) Click Finish to create the  Second Activity . You'll see one method is overridden it's named onCreate . The activity is auto