Intro to Activity and Its Lifecycle
Activity is one of the four components of Android and it provides an interface to the user so that they can interact with the views.
Simply, activity is a single screen in an app. It could be a maps screen in the Google Maps app or user profiles in the Facebook app or contacts list screen in the Contacts app and settings screen in the Settings app. Most apps contain multiple screens and inside these screens, you have buttons, edit texts, check boxes, list items and more with which you can interact.
Activities should be declared in the manifest file and of all the activities in an app, only one activity will be the launcher activity.

2) Now, select the Basic Activity and change the activity name to Second Activity.

3) Click Finish to create the Second Activity.
You'll see one method is overridden it's named
Similar to the existing overridden method in the Second Activity, we can override a few methods like
Activities should be declared in the manifest file and of all the activities in an app, only one activity will be the launcher activity.
How to create an Activity:
1) Right click on the app module, hover over New option and then on the Activity.
2) Now, select the Basic Activity and change the activity name to Second Activity.

3) Click Finish to create the Second Activity.
You'll see one method is overridden it's named
onCreate. The activity is automatically added to the AndroidManifest.xml file during the creation. (Something like below.) <activity
android:name=".SecondActivity"
android:label="@string/title_activity_second"
android:theme="@style/AppTheme.NoActionBar">
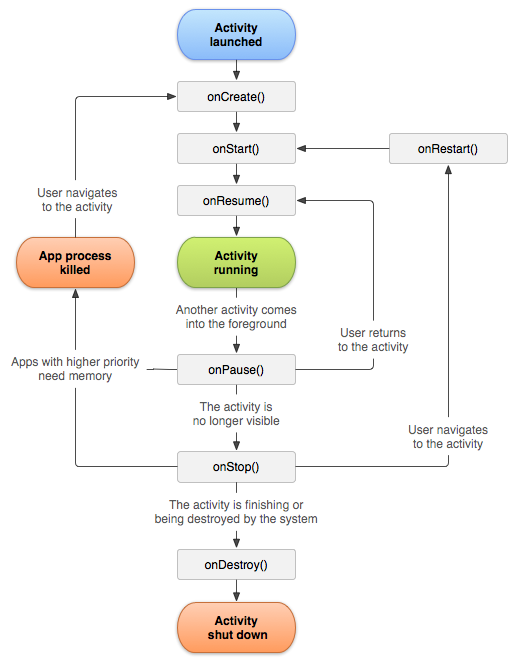
activity tag is added to the AndroidManifest.xml file under the application tag. It has attributes like name, label, and theme. name is the package name, theme is the activity theme and label is the title of the activity which is visible on the toolbar when the activity is launched.The lifecycle of an Activity:
The lifecycle of activity helps you understand when the activity gets created, destroyed and how you need to manage the states so that the app is less likely to suffer unexpected behavior, reduce the consumption of battery and the user will have better experience.Similar to the existing overridden method in the Second Activity, we can override a few methods like
onResume, onPause, onStart, onStop, onDestroy, onRestart (shown below).override fun onCreate(savedInstanceState: Bundle?) {
super.onCreate(savedInstanceState)
setContentView(R.layout.activity_second)
setSupportActionBar(toolbar)
Log.d("SecondActivity", "Activity Created")
}
override fun onRestart() {
super.onRestart()
Log.d("SecondActivity", "Activity Restarted")
}
override fun onStart() {
super.onStart()
Log.d("SecondActivity", "Activity Started")
}
override fun onResume() {
super.onResume()
Log.d("SecondActivity", "Activity Resumed")
}
override fun onPause() {
super.onPause()
Log.d("SecondActivity", "Activity Paused")
}
override fun onStop() {
super.onStop()
Log.d("SecondActivity", "Activity Stopped")
}
override fun onDestroy() {
super.onDestroy()
Log.d("SecondActivity", "Activity Destroyed")
}
These overridden methods are part of the Activity lifecycle and we will discuss them below in detail.
onCreate():
Called when the activity is created. The is the first callback ever triggered before the UI elements are drawn and their positions are calculated. You can attach a layout to the activity using
setContentView() and start initializing the UI elements or variables as this is the initial state.
onDestroy():
Called when the activity is destroyed. Final callback an activity receives before it is torn down and eventually removed from the memory.
The activity is getting destroyed because of the back button click or
Also, any resources (like the database instances) or listeners (like broadcast listeners) that is not cleared in
The activity is getting destroyed because of the back button click or
finish is called or the orientation of the device changed or the screen size is scaled for multi-window.Also, any resources (like the database instances) or listeners (like broadcast listeners) that is not cleared in
onStop should be removed in the onDestroy.
onResume():
Called when the activity is resumed. The activity is visible to the user and they can start interacting with it. This is where you start the camera preview or other system resources that only one application on the device can use at a time.
onPause():
Called when the activity is paused. In this case, the activity is partially visible to the user but they can't interact with the elements on it.
This method is executed for a very short period of time, so, heavy running tasks like saving data to the storage or database or network calls or heavy shutdowns should be performed in
This method is executed for a very short period of time, so, heavy running tasks like saving data to the storage or database or network calls or heavy shutdowns should be performed in
onStop instead.
onStart():
Called when the activity is started. In this state, the activity is visible to the user and ready to become interactive. This method is shortlived.
onStop():
Called when the activity is stopped. Stopped meaning the activity is no longer visible to the user. This could be because the app is closed or different activity is opened.
This method is the ideal place to release system resources, remove location listeners and stop animations. Removing location listeners in
This method is the ideal place to release system resources, remove location listeners and stop animations. Removing location listeners in
onStop and not in onPause makes sure that the location information and its related UI is updated even when the app is multi-window.
onRestart():
Called when the activity is restarted after it is stopped.
Let's take a look at multiple scenarios to understand when these methods are called.
Sc1: Activity is launched for the first time.
For the activity to launch, the activity needs to created, the layouts need to be attached, the UI elements need to be placed at the right position and the user should be able to interact with them. So, in this case,
onCreate, onStart and onStop are called.
Sc2: A dialog is shown on top of an activity.
The activity becomes partially blurred by the dialog and this calls the
onPause method. Once the dialog is dismissed, onResume is called. No other lifecycle methods are called.
Sc3: A phone call is received or home button clicked.
In both the scenarios, the activity is hidden completely triggering the
onPause and onStop methods. When you get back to the activity by ending the call or opening the application, the onRestart, onStart and onResume methods are called.
The second half of the flow is only disrupted when the system is need of resources and it decides to kill the app. In this case, the flow mostly remains the same with small change. When the app is minimized by clicking the home button, the
onPause, onStop is called subsequently. Now, the system kills the application and when launched again, instead of calling onRestart and onStart, the onCreate and onStart is called followed by onResume.
Sc4: Back button is clicked or called finish().
When the back button is clicked or
finish() then the activity gets destroyed. The activity will go to onPause state then onStop state and finally onDestroy callback is called.
Sc5: Screen is rotated
Screen rotation event makes the system to tear down the visible screen and re-create it. In this case,
onPause, onStop, onDestroy are called during the teardown process and during the re-creation process onCreate, onStart, onResume are called.
This is the reason why, when the screen is rotated, you lose the data stored in the variables and the information on the screen is lost.
Sc6: Different activity is opened from the current activity
First, the current activity goes to pause state calling
Sc7: Scaled to multi-window
Similar to screen rotation, the system tears down the activity and recreates it. Along with both the actions. the system takes the focus away from the app. So, during the teardown,
Sc6: Different activity is opened from the current activity
First, the current activity goes to pause state calling
onPause. When the current activity is in the pause state, the different activity is created, started and resumed triggering onCreate, onStart and onResume in succession. Now, the current activity is completely covered, its onStop is called.Sc7: Scaled to multi-window
Similar to screen rotation, the system tears down the activity and recreates it. Along with both the actions. the system takes the focus away from the app. So, during the teardown,
onPause, onStop, onDestroy is called and during the recreation onCreate, onStart, onResume is called as usual. Since the app loses focus onPause is also called.
For better understanding, build a sample application and log the overridden lifecycle methods then perform the above scenarios and verify the logs.