Posts

The Kano Method in Product Management: A Comprehensive Guide

Image
Introduction Understanding what truly delights customers is one of the biggest challenges in product management. While some features are essential, others can significantly enhance customer satisfaction or even exceed expectations. The Kano Method is a powerful prioritization framework that helps product managers classify product features based on how they impact customer satisfaction. Developed by Professor Noriaki Kano in the 1980s, this method categorizes product features into different types of customer needs—ranging from basic expectations to features that create excitement. By using the Kano model, product managers can prioritize features that maximize customer satisfaction while balancing essential functionality. In this article, we'll dive deep into the Kano Method, its categories, how to apply it, and why it’s a game-changer for product prioritization. What? The Kano Method is a customer satisfaction framework that helps product managers categorize product features based o...

The MoSCoW Method in Product Management: A Comprehensive Guide

Image
Introduction In product management, prioritization is crucial to ensure that the most valuable features and tasks are delivered efficiently. With multiple stakeholders, limited resources, and tight deadlines, product managers must decide what to focus on first. One of the most effective prioritization frameworks used in Agile development and project management is the MoSCoW method. The MoSCoW method helps teams categorize tasks and features into four priority levels—Must-Have, Should-Have, Could-Have, and Won’t-Have—allowing them to focus on what is essential while maintaining flexibility. This structured approach ensures that development teams work on the most impactful features, aligning product releases with business goals. In this article, we’ll explore the MoSCoW method, its benefits, and how to use it effectively in product management. What? The MoSCoW method is a prioritization framework that helps teams determine the importance of features, requirements, and tasks. It categoriz...

The RICE Method in Product Management: A Comprehensive Guide

Image
Introduction Determining what takes precedence is among the toughest parts of managing a product. With numerous ideas, requests, and features competing for attention, how do product managers decide what to work on next? One widely used framework for prioritization is the RICE Method, which helps teams assess and rank product initiatives based on four key factors: Reach, Impact, Confidence, and Effort. The RICE method provides a structured way to evaluate projects objectively, ensuring that resources are allocated to initiatives that deliver the highest value. This article explores the RICE scoring framework, its components, benefits, and best practices for using it effectively in product management. What? The RICE framework is a prioritization model that enables product managers to systematically evaluate different product initiatives by assigning scores based on four criteria: Reach – Number of people affected? Impact – Contribution to the overall goal? Confidence – Certainty of re...

Store Key Value Pairs Using Jetpack Data Store

One of the ways we can store information on an Android device is by using Shared Preferences. These Shared Preferences help us save key-value pairs. A newer way of saving such key-value pairs is using the Jetpack library Data Store . The Data Store library saves the key-value pairs using coroutine blocks and provides the ability to read the saved preferences using the collect function available in the Kotlin Flow. In this article, we will take a look at the Data Store class available in the Jetpack library and how to save, read the data using it. The first thing we need to do is add the dependency in the module level build.gradle file. implementation "androidx.datastore:datastore-preferences:1.0.0-alpha06" Create an instance of the Data Store using context and by passing the file name to the createDataStore function. Android creates the data store file inside a folder named datastore and this folder will be available in the app's files directory. The name passed to th...

Use Java8 APIs on Older Android Versions

Image
The less adoption of Java8 APIs in the Android Codebase is because of the lack of support on the older versions. Even though Java8 was released in 2014, it took a while for Google to resolve the issue. Existing Issue We will take an example to understand the issue in detail. Let's say we have an array list that contains countries and we need to check if the desired country is available in the list. The code to achieve it would look something like below. if (Build.VERSION.SDK_INT >= Build.VERSION_CODES.N) { // Find the country with name India val country = countryArrayList.stream().filter { it == "India" }.findFirst() if (country.isPresent) { // Country is present in the list } else { // Country is not present in the list } } else { // For loop to filter and find the item on the older version var countryPresent = false countryArrayList.forEach { if (it == "India") { // Country is present in t...

Listen to Back Button Clicks in Fragment

Listening to the back button click event inside the fragments, comprised of a painful implementation of the interfaces and the onBackPressed method calls in both Activity and Fragment, prior to the introduction of the OnBackPressedDispatcher . But now, inside a Fragment, the back button behaviour can be controlled by listening to the callback returned by the OnBackPressedDispatcher . This callback listener is implemented inside the  onCreate overridden method. override fun onCreate(savedInstanceState: Bundle?) { super.onCreate(savedInstanceState) // Listen to Back button clicks val callback = requireActivity().onBackPressedDispatcher.addCallback(this) { // Handle the back button event } } Use onBackPressedDispatcher method to get the OnBackPressedDispatcher and add the callback using the addCallback method. This callback method takes a lifecycle owner. Handle the back button events whenever the callback gets triggered. The same implementation can be d...

Run the Emulator directly in Android Studio

Image
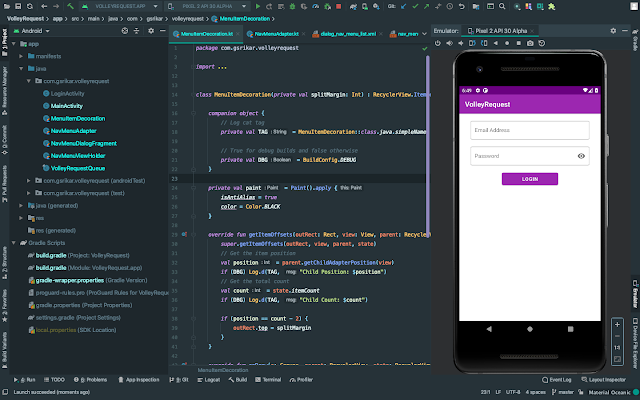
In Android Studio 4.1, a minor feature is released to reduce the screen (or window) switching between Android Studio and the Emulator. Using this feature, we can now run the Emulator directly inside the Android Studio. We can make the changes to the code and see the changes reflect in the emulator in the same window similar to layout XML and its preview. To achieve this, open the Preferences window and select the Emulator menu item under the Tools expandable menu. Here we can check the option Launch in a tool window and click OK . Now run the Emulator to see it inside the Android Studio window.

Track Android App Crashes Using Firebase Crashlytics

Crashes irritate the users and ruin the impression of the application while frequent crashes provoke the user to uninstall the application. Most of them might choose a competitors app and some of them might leave bad reviews on the Play Store. Either way, the application crashes negatively affect the business. Minimizing crashes is critical in improving overall user experience and retaining them. Best way to understand the issues in the application is by tracking crashes and solving. We need to find out if a particular crash is impacting a lot of users, get alerts when an issue suddenly increases in severity. and figure out which lines of code are causing crashes. Firebase Crashlytics is one such product that helps track crashes in realtime, understand the severity, get a glimpse of user composition affected by the crash, stack trace to resolve the crash and more. Before we start integrating the Firebase Crashlytics, we need to add Firebase to our project . Once we have added Firebase,...

Add a Module to an Android Project

Image
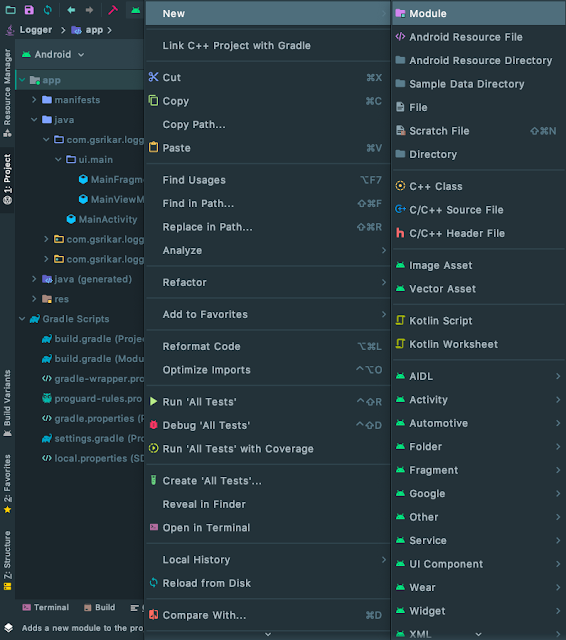
In this article, we will take a look at creating a new module and adding it to our project. First, create a new project or open an existing project. Right-click or tap with two fingers on the app module or the project. This opens an options menu where we need to click on New and then on Module option in order to start the process of creating a module. The other way to start the module creation process is by clicking on the File menu in the top bar, hovering over New option and then clicking on the New Module option. Clicking on the New Module option opens a window where we need to select the Module type. Select the preferred module type based on feature development. For example, we can select the Android Library type if we are building a library, the Android TV Module if we want to expand our app to be available on TV, the Dynamic Feature Module if we want the feature to be available upon user request and not bloat the app size when packaging. In the next window, we have to en...

Create Assets Folder, Add Files and Read Data From It

Image
Sometimes, we need to read the data stored in the files during runtime and want to make sure the data is not tampered by the Android build system. In this article, we will take a look at how to create the assets folder using Android Studio and read the stored data from it. First, Right-click on the module name or the package name. This opens an option window where we need to select the Assets Folder option by hovering over New and then on the Folder option. Now, we will see a window where we change the folder location and the source set. Change the values if necessary otherwise keep the defaults and click Finish. It may trigger a Gradle Sync. Irrespective of the sync, the Assets folder is created and is visible in the module. Now, Right-click on the Assets folder and click on the File option by hovering over the New option. Enter the name of the file name and click Enter to create the file. The file with the name user_details.json is created under the assets folder. Add some JSON...

Create Multiple YouTube Channels

Image
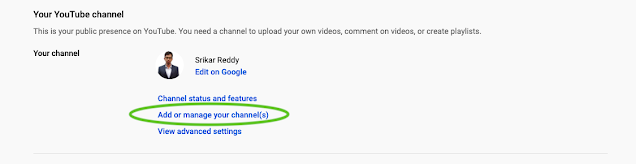
In this article, we will take a look at creating multiple YouTube channels under the same email address instead of using multiple email addresses for multiple YouTube channels. 1. Go to the Youtube account settings page. 2. Find and click on the Add or manage your channel(s) option under the Your YouTube Channel section. 3. In the next page, we are shown the list of existing channels and an add button to create another channel. Click Create a new channel card. 4. In the next page, enter the channel name (brand name) and click the  Create button. 5. After multiple redirects, we are taken to the home page of our channel where we can start uploading our videos to the new channel.

Add Options Menu to Activity and Fragment

Image
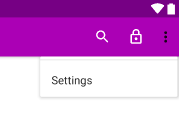
Options Menu contains a set of primary menu items that are accessible to the user. In this article, we will take a look at how to implement the options menu in an Android Activity or a Fragment. Right click on the res directory in Android Studio and select Android Resource File option. It opens the Resource File creation modal where we need to enter the file name and select Resource Type as Menu. Clicking on OK button creates main_menu.xml under menu directory. Now add the following items to the XML file. <menu xmlns:android="http://schemas.android.com/apk/res/android" xmlns:app="http://schemas.android.com/apk/res-auto"> <item android:id="@+id/search" android:icon="@drawable/ic_search_white" android:orderInCategory="100" android:title="@string/action_title_search" app:actionViewClass="androidx.appcompat.widget.SearchView" app:showAsAction="ifRoo...

Change Snackbar Position When Bottom App Bar or Bottom Navigation View Is Present

Image
The SnackBar is mainly used to provide feedback to the user and it is shown at the bottom of the screen. This UI element is used alongside Toast or as a replacement in some application. We typically show snack message as follows. // Show snack message Snackbar.make(binding.coordinatorLayout, message, LENGTH_SHORT) .show(); This works well as long as the screen does not contain the Bottom App Bar or the Bottom Navigation View. When we have the specified elements the Snack Message overlaps on the Bottom App Bar or ends up behind the Bottom Navigation View. This behavior is shown in the images below. To avoid such behavior we need to use setAnchorView method and pass id of a view. The Snack Message is shown on top of the view element with the specified id. // Show snack message Snackbar.make(binding.coordinatorLayout, message, LENGTH_SHORT) .setAnchorView(binding.fab) .show(); Similarly, when Bottom Navigation View or Floating Action Bu...

Material Chip in Android

Image
Chip , a Material Design Component is used as an action like setting an alarm or a choice like selecting a gender or to filter items like dress types or input types like hints. Similar to RadioGroup , if we want to create a group of chips with single selection behavior we use ChipGroup and set singleSelection variable to true. <com.google.android.material.chip.ChipGroup android:id="@+id/genderChip" android:layout_width="0dp" android:layout_height="wrap_content" android:layout_marginStart="@dimen/edit_text_horizontal_margin" android:layout_marginTop="@dimen/edit_text_vertical_margin" android:layout_marginEnd="@dimen/edit_text_horizontal_margin" app:layout_constraintEnd_toEndOf="parent" app:layout_constraintStart_toStartOf="parent" app:layout_constraintTop_toBottomOf="@+id/fullNameTextInputLayout" app:singleSelection="true"> ...

Create Github Repository

Image
Github is a freemium cloud-hosted version control system where the developers can host unlimited public and private repositories for free. Follow the below steps to create a new repository on Github. 1. The very first thing to do is go to the link https://github.com/new . It provides the fields to enter in order to create our repository. 2. Enter the Repository name  and Description for our project. 3. We can select our project to be a Public project or restrict it to be Private . 4. In addition to that, we can create our project with a default README file by checking the box, gitignore file by selecting the language and a license from the dropdown. 5. Finally, click on the  Create repository button. This creates a Private project that a link  https://github.com/gSrikar/Android-Studio-Settings .

Request Result Using startActivityForResult and Listen to It in onActivityResult

Let us say we have two activities (First Activity and Second Activity) in our Android application then startActivityForResult() is used by the First Activity when it expects a result from the Second Activity and onActivityResult() is used to read the returned result from the Second Activity. In simple terms, we can send information to the top activity in the back stack. From our First Activity, start the Second Activity with a request code. // Open the second activity startActivityForResult( Intent(context, SecondActivity::class.java), REQUEST_CODE_FETCH_RESULT ) This opens the Second Activity. When we are done with the Second Activity and want to pass the data back to the First Activity, we call setResult and close our Second Activity. // Set the result in the Second Activity val intent = Intent().apply { // Intent extras putExtra(BUNDLE_EXTRA_ACTIVITY_FINISHED, true) } activity?.run { // Set the result setResult(RESUL...