Posts

Bottom App Bar for Android - A Material Design Component

Image
Similar to an App Bar (Top App Bar or Toolbar), Google introduced the Bottom App Bar as part of the Material Design Components back in 2018. Let's get into the implementation by adding a dependency to the build.gradle file. implementation "com.google.android.material:material:1.2.0-alpha03" In the next step, let's add the BottomAppBar and the FloatingActionButton to the activity layout. <com.google.android.material.bottomappbar.BottomAppBar android:id="@+id/bottomAppBar" style="@style/Widget.MaterialComponents.BottomAppBar.PrimarySurface" android:layout_width="match_parent" android:layout_height="wrap_content" android:layout_gravity="bottom" app:hideOnScroll="true" app:fabAnimationMode="slide" app:menu="@menu/menu_main" app:navigationIcon="@drawable/ic_menu_white" /> <com.google.android.material.floatingactionbutton.F...

StringRequest Volley - Retrieve Response as String

Image
Volley is an Android HTTP networking library. In the previous article , we had a glimpse of the Volley library and performed a POST request using JsonObjectRequest . In this article, we will fetch the response as string from https://reqres.in/api/users/2 and display it as the TextView text. For this purpose, we will be using StringRequest which makes a GET request to an endpoint and returns the response as a string. // Build the request final StringRequest stringRequest = new StringRequest(URL_USER, new Response.Listener<String>() { @Override public void onResponse(@NonNull String response) { // Api call successful Log.d(TAG, "Response: " + response); // Show the response on the screen responseTextView.setText(response); } }, new Response.ErrorListener() { @Override public void onErrorResponse(@NonNull VolleyError error) { // Api call failed // Print the error to stacktrace error.printStackTrace();...

Perform a Post Request Using Volley

Image
Volley is a very simple customizable HTTP client introduced by Google. Volley comes with request caching, prioritization and ordering. In addition to that, making concurrent network requests and canceling them is easier with Volley. First, create a project and add volley dependency to the module level build.gradle file. implementation 'com.android.volley:volley:1.1.1' Create a login screen with username, password and a login button. User is able to enter their email address and password as shown in the figure below. Build the login payload with entered username and password. // Build the request payload final JSONObject jsonObject = new JSONObject(); try { jsonObject.put("email", email); jsonObject.put("password", password); } catch (JSONException e) { e.printStackTrace(); } Lets us make an API call to https://reqres.in/api/login with the built request payload to log the user in. // Build the request final JsonObjectReq...

Add Firebase Google Analytics to the Android Project Using the Firebase Assistant

Image
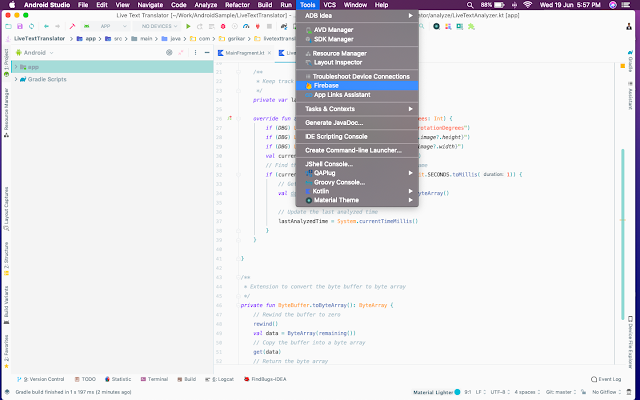
Google Analytics for Firebase is an analytics solution that helps the developers understand user behavior in their applications. In this article, we will take a look at creating a Firebase project and adding Analytics to the android project with the help of Firebase Assistant available in the Android Studio IDE. 1. Open an existing Android project or create a new project in the Android Studio. 2. Tap on the Tools tab and select the Firebase option. 3. This opens the Firebase Assistant window on the right side of the Android Studio. Expand Analytics and tap on Log an analytics event . 4. Now, we can see the instructions to integrate Analytics. Click on the Connect to Firebase button. [If we are not logged in to the google account, a Sign in with Google page is opened in the browser. Once logged in, it is redirected to another webpage where we need to select Login to Firebase option.] This opens a dialog with the options to select the project name fr...

Capture Images with CameraX

Image
Google at its 2019 I/O introduced CameraX, a camera library as part of the Jetpack support library. With CameraX, the developers can spend less time writing the logic to set up the preview to analyze the preview or capture an image and more on time business logic. CameraX is built to simplify three use cases when building a camera application. These are showing a preview, taking a picture and analyzing the image. In addition to that, CameraX provides what is called CameraX Extensions, which enables the developers to take advantage of the device-specific and vendor-specific effects like bokeh, HDR, Night, Beauty mode. With this, the features of the native camera application on the device can be easily extended to our application. A temporary disadvantage is that the CameraX is available for the devices running API 21 (Lollipop or Android 5.0) and higher. This is because of its heavy use of Camera2 API's. In this article, we will take a look at how to show camera...

Listen to Phone Restarts on Android

When a phone is restarted the system broadcasts ACTION_BOOT_COMPLETED to all the apps that have the RECEIVE_BOOT_COMPLETED permission . In this article, we will learn how to make our app listen to phone restarts. 1) Add permission to the AndroidManifest.xml file. <uses-permission android:name="android.permission.RECEIVE_BOOT_COMPLETED"/> 2) Create a broadcast receiver and add ACTION_BOOT_COMPLETED intent filter to receive the broadcasts. <receiver android:name=".BootCompletedReceiver"> <intent-filter> <action android:name="android.intent.action.BOOT_COMPLETED" /> </intent-filter> </receiver> public class BootCompletedReceiver extends BroadcastReceiver { private static final String TAG = BootCompletedReceiver.class.getSimpleName(); @Override public void onReceive(Context context, Intent intent) { if (intent != null && intent.getAction() != null ...

Add Spacing to Recycler View Linear Layout Manager Using Item Decoration

Image
In this article we will learn about, item decoration in Android and how we can use it to add even spacing between the child items. A RecyclerView without spacing will look like the image below but in most cases, we want to add spacing between the items. [You can see there are no margins between the views and only elevation] A more traditional option is adding margins in the list item xml file. If we take this route, we will soon end up with uneven spacing issues with vertical margins. [There are even left, right, top, bottom margins for all the rows except the last item in the first image and in the subsequent image, the top margin for the first item is half of the other items] The best way is to add the ItemDecoration to the RecyclerView as it affects the individual items and you can have more control over them. Kotlin: /** * Add vertical, horizontal spacing to the recycler view */ class DefaultItemDecorator(private val horizontalSpacing: Int, ...